Showing posts with label Sharing Family History. Show all posts

Thursday, November 1, 2012

Facebook - A Genealogist's Tool for Record Keeping, Research, and Collaboration

Benefits of Using Facebook for Genealogy


  • Facebook serves as a type of journal and records everything you post in chronological order.


  • Facebook can keep you up-to-date with your family, both immediate and extended.


  • Facebook can re-connect long-lost family members.


  • Facebook can aid genealogical research with pages specific to localities, families, organizations, businesses, etc.


  • Facebook offers a place to store and share family history information.


Issues to Be Aware of and Work Around


Privacy – Restrict your personal information, choose your friends carefully, take advantage of extra security measures such as two-step verification.

Photo resolution – Photos are not stored on Facebook in a high resolution.

Technology Comfort Level – Not all your family will be comfortable with Facebook due to experience with technology. Think of it as an opportunity to connect with some, but not all, family members. 


Facebook may not replace methods you already use as a genealogist, but it can certainly be a useful addition. You may make discoveries and see pictures you never would have known, and offer that same opportunity to family you know and to cousins you might never have met.

Saturday, March 24, 2012

Blogs - They're not just for reading...

This is the symbol for Blogger, a blog hosting service offered by Google.

Ever thought about starting your own blog?
Here are some good reasons to do it:

1. Just like you can learn a lot by reading others' blogs, others can learn a lot by reading a blog hosted by you. Be a giver of information!

2. Blogs are an easy way to get started using the cloud. The data you upload to a blog is saved in "the cloud". Who knew?!


3. A blog is a cheap (as in free!) way to back up your data. Everything you put on the blog is backed up by whatever blog hosting service you use.


4. Sharing your family history finds on a blog gets the info to interested family members quickly. Find it, post it - it's that easy. Forget the photocopies! Eradicate the emails! Lose the links! It's all on the blog for whomever wants it. They can print the images and documents you post or they can save it to their own computer.


Following are a couple examples of using 
a blog to share family history information.

The first blog holds images from a scrapbook. Sharing the scrapbook on a blog has several advantages over printing books for family members. One, it's free; two, it can be shared widely; three, it can be printed or downloaded by others...saving you time; and four, distant cousins (whom you may not even know) can find it on the web.


The second blog holds documents and images. It's organized more like a file cabinet of information than like a scrapbook. Viewers can download or print anything from the blog.


Watch these short videos about
how to create a blog on Blogger:


Blog your Family History Part 1

(Click on "YouTube" at the bottom of the screen to 
watch it on YouTube with a larger screen.)


Blog Your Family History Part 2 

(Click on "YouTube" at the bottom of the screen to 
watch it on YouTube with a larger screen.)


Blog Your Family History Part 3

(Click on "YouTube" at the bottom of the screen to 
watch it on YouTube with a larger screen.)


Now go share your family history with your own blog!

Thine in the bonds of family history fun!  Caroleen

Sunday, March 18, 2012

Flash Drives


A "flash drive" (aka thumb drive, jump drive, pen drive) is a portable device that allows you to carry your digital information with you. 

There are many reasons and ways to use a flash drive:

1. If you ever work from more than one computer, a flash drive is a great way to transfer your information from one place to another. A flash drive will allow you to keep your files at hand without having to email them to yourself or worry about which file is the most current.

2. You can share files with other people by giving them digital copies of photos or documents on a flash drive. At about $4 for a 1 GB flash drive, it's an inexpensive way to give someone a lot of information.

3. Flash drives can be erased and new information can be added, making them a better alternative to cds that cannot be overwritten.

4. Digital photo displays sometimes use a flash drive as a storage device for the photos on display. Photos can be changed or added to the flash drive.

5. Flash drives can be password protected in order to secure the data on them.

6. Flash drives can store all kinds of data...music, executable files, documents, photos, videos, etc.

How to use a Flash Drive

A flash drive plugs into a USB port on your computer. After it is plugged in, "plug and play" software makes it viewable and usable on your computer. The computer assigns it a "drive" such as "E", "F", "G", etc. The drive assigned to the flash drive will not necessarily be the same on any one computer, nor across multiple computers. Pay attention to the drive assigned to your flash drive.


When you first plug the flash drive into the computer, a box like this will probably appear:

 You may either close it or click on "Open folder to view files" if you'd like to see what's on your flash drive.

When you look at the "My Computer" view on a PC, you will see something like this:


Image from the SanDisk website: www.SanDisk.com

 You can see that this flash drive was assigned drive "J". You can see that there is a default name for the flash drive which was chosen by SanDisk, the company that manufactured it. In this case, the name of the flash drive is "Cruzer 32 GB".

How to Change the Name of your Flash Drive

In order to help you recognize your flash drive and the contents of it, you may change the name of your flash drive. Right click on the flash drive name and choose "Rename". You can then choose a short name such as "Fam History" or "Genealogy" or "Carole Flash". That way when you plug it into a computer and look for it, it will be easy to recognize no matter how many other devices, removable disks or flash drives are installed.


You can see in this photo of the "Computer" or "My computer" screen that the drive assigned to this flash drive is "E" and that the flash drive was renamed from "Cruzer" to "CKELLY FH" for "Caroleen Kelly Family History". Renaming it makes it a lot easier to recognize.


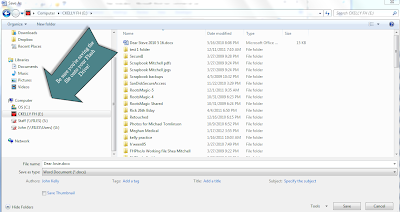
The Flash Drive Contents are Organized the Same as any 
Other Drive on Your Computer

When you double click on the flash drive in "Computer" or "My Computer", you'll see all of the folders and files as in the photo below:


 The arrow points out the flash drive and the area to the right shows the contents of the flash drive. Access these folders and files just as you would any file on your computer.

 Remember the Drive Name Assigned to Your Flash Drive (E, F, etc)

Be careful when working from your flash drive that you really are working from it! Check the file location at the top of whatever program you're working in to be sure you're working from the drive assigned to your flash drive:

When you save your work be sure you're saving it in your flash drive and not on the computer's hard drive: 


Where to Purchase a Flash Drive

You can purchase a flash drive at just about any store that sells computer accessories, including online stores like Amazon.com. Prices are very reasonable and have come down in the last couple years. A 32 GB SanDisk Cruzer can currently be purchased for about $26. A 4 GB SanDisk can be purchased for just under $7.

How Much Data Will a Flash Drive Hold?

The amount of data that will fit on your flash drive depends upon how many GB the flash drive will hold and how large your files are. Video files at a high resolution take up more space. Documents take up very little space. According to CFgear.com, a 32 GB flash drive will hold over 50 hours of high quality video; or 30,000 photos; or 6,000 PowerPoint Presentations. For smaller flash drives just divide by the number of GB available. For the average person storing family history information without much video, a 4-8 GB flash drive should be large enough, but with the price so low on even the largest flash drives, it doesn't hurt to go bigger. If you buy a smaller flash drive and run out of space, all you need to do is buy a larger one and transfer your information to the new one.

Removing (or Ejecting) your Flash Drive from Your Computer

When you're on the go again and want to remove your flash drive from the computer, don't just pull it out! If it's removed when a file is being accessed, the file may not be saved correctly or, even worse, may be damaged. 

There is a protocol for removing a flash drive from a PC:

1. Close all files being accessed from your flash drive. For instance, if you're using a family history program and the file used is stored on your flash drive, save it and close it.

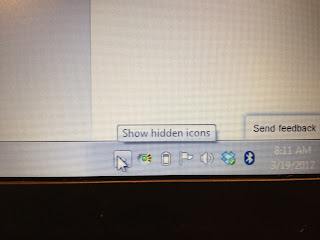
2. Right click on the "Safely Remove Hardware and Eject Media" icon on your toolbar or the hidden icons area of your toolbar:


The cursor shows where to find the hidden icons.

Clicking on "Show Hidden Icons" will bring up a box where you may find your "Safely Remove Hardware" icon shown with the red arrow below.


Right click on the "Safely Remove Hardware" icon to open a box like the one shown below:


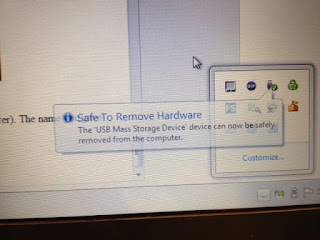
 Click on "Eject Cruzer" (or whatever your device was named by the manufacturer). The name you gave your flash drive will appear below it to help you recognize your flash drive. If it's safe to remove your flash drive (meaning your flash drive is not being accessed by your computer), the following message box will appear on your screen and you may remove your flash drive from the computer:

The "Safe To Remove Hardware" message


If you get a message box that says the device cannot be stopped, then make sure to close all programs that may be accessing the flash drive and repeat the process to safely remove your flash drive.

Tuesday, March 13, 2012

Early Adopter of Family Tree

Logo registered to the Church of Jesus Christ of Latter-day Saints

New FamilySearch will soon be Old FamilySearch and users of the New FamilySearch system will be signing into their "New FamilySearch" account at the "Family Tree" tab at the top of the FamilySearch.org website. At present, the "Family Tree" tab will allow access to those who sign up to be "early adopters" of the system. Early adopters can view their tree and see all that they are able to see at "New Family Search", but the system is not fully functional.

As of March 14, 2012, the "Family Tree" will allow you to add dates and locations to events (such as birth, christening, and death) which don't yet have dates assigned, change dates and locations (but not contribute additional dates), add sources, add names and "other information", and participate in discussions. You may also "unreserve" or "reassign" temple ordinances. The "Family Tree" will not yet allow you to reserve temple ordinances, add individuals, combine individuals, nor upload gedcoms.

Eventually the "Family Tree" will be fully functional. It has an intuitive interface and is much cleaner and more user-friendly than "New FamilySearch". All those benefits aside, the biggest difference I expect to see between "New FamilySearch" and the "Family Tree" will be the the attention paid to source citations, evidence, and analysis. The current "New FamilySearch" is full of mistakes and conflicting information. Those who put the effort in to correct the mistakes have their sources (if they bother to add them) buried deep and virtually not accessible to others. With the words "source", "evidence" and "analysis" everywhere on each "ancestor" view, it should be obvious to those collaborating on an ancestor that verification of information is a priority. Those adding or changing information will easily be able to add their sources and those accessing information will have sources and analysis front and center.

If you would like to be an "early adopter" of the "Family Tree", click below and sign in with your LDS Account:

Click HERE to be directed to the "Early Adopter" invitation!

This is the page you will be directed to when you click on the link above:


Notice that those who sign up are known as "early adopters" of the system. Eventually everyone will use this new system. When you get to this page, sign in with your LDS Account, if you have one. If you don't have an LDS account, click on "Register". After signing in you will automatically be brought to the "Family Tree" on the FamilySearch.org site.

When you want to access the "Family Tree" again, you will go to the FamilySearch website where you will see a screen like this:


You can see from this screen shot that no "Family Tree" shows up at the top of the page between the FamilySearch logo and the "Learn" tab. You will need to sign in. After signing in the "Family Tree" tab will appear as seen below:


After signing in you will see the "Family Tree" tab to the left and the name you registered with your LDS Account to the right. Click on the "Family Tree" to access your family tree. Remember the site is not fully functional, but it's worth spending your time in as it is developed.

If you're on a shared computer, remember to "sign out" when you are done so that the next person to use the computer will not be able to access your account.

Sunday, February 19, 2012

Sharing - Free Charts! Fan, Pedigree, and a Name Cloud

This is an example of the Fan Chart from the: BYU-Idaho Family History Center Blog

TreeSeek has partnered with FamilySearch and Geni.com to provide users with a number of free charts including a fan chart, a few types of pedigree charts, and a name cloud. Click on TreeSeek.com to try it out.

The home page looks like this:


Click on "My Trees" or the "Start Now!" button to go to this page:


From here you will login. Choose to login to either your FamilySearch account or Geni account. (Currently no other online trees are supported.)

Click on "Create Tree". You'll be brought to a page where you choose the person you would like to be the start of your tree...usually yourself, one of your parents, or one of your children. Then click on "Create Data Set". It may take a few minutes to generate. Then you will see this page:


In the dropdown box above the "Create Chart" button, you can choose from three different size pedigree charts, a 9 generation fan chart, or a "name cloud". After selecting the type chart you want, click on "Create Chart". A box will open that allows you to either "open" or "save". You may save it to your computer and then print it. My print box allows me to choose either one page, a poster, or a tiny image on a page (multiple and booklet...neither of which are very practical). Make your choice and click on "print".

Here's an example of the name cloud:


The name cloud should be printed from your browser's "print" option.

TreeSeek is in Beta. For this reason, you may see the site change over time, or there may be a glitch or two. Click on "Give Feedback" to let the TreeSeek people know what you think!

Sunday, February 12, 2012

Sharing Family History - Word Search Puzzle

A simple way to share some information with all ages in your family is to create a word search puzzle. Choose themes like "Ancestors' Surnames" or "Occupations of Your Ancestors" and make it fun for your family to meet their ancestors. 

Go to DiscoveryEducation.com's PuzzleMaker and choose Word Search to create something like this:


Ancestors Occupations and Avocations

H R C L M C D R A D C X T T O A
M P R U E B A N F F O P V W S U
L T Z E C K N R X A T H I O I A
N Y X N H N R U P N T Z N R W R
R S J Q A C Y E A E O J O F X E
Z F K M N U A I D H N N T A D M
U W C Q I E R E I N M T A F R R
A P G T C A T G T O I R E G E A
K C A J R E B M U L L B Z R K F
U V U B Q G I L C W L K K P A G
S C I B Q L D R I B W T A O M P
K L N A M E R I F O O O P B O U
K M C P R H F K T A R V C D T B
W P F V R Q V D P L K Z B U U I
L V N D C W Q I D Y E Y F G A M
S H O E M A K E R D R N W G X A

AUTOMAKER
BOOKBINDER
CARPENTER
COTTONMILLWORKER
FARMER
FIREMAN
IRONMOULDER
LIBRARIAN
LUMBERJACK
MECHANIC
SHOEMAKER
TEACHER

You can print directly from your browser or copy and paste it into another application like Microsoft Word. Solutions can be printed, too. 

At Discovery Education's website you'll see other puzzle options. The simplest is this word search, but give others a try. 

You can also do a web search for other websites offering free puzzles. Just check to make sure it's really free (or not too pricey for you) before investing a lot of time into creating a puzzle you may have to pay for in order to print.